Showing posts with label Crafts for Kids. Show all posts

Wednesday, August 21, 2013

Yarn-Wrapped Frame Tutorial


I originally shared this tutorial  a while back on my friend, Elaine Vicker's blog, The Middle Grade Science Project. She needed a craft to go along with the fun book Framed by Frank Cottrell. So...of course, I made frames!


 This is a super easy craft that lets kids put a bright and colorful spotlight on their artwork.
So, let's get to it...

Step #1: Gather up your supplies
  
   ~ cereal box
   ~ yarn
   ~ glue
   ~ exacto knife
   ~ ruler

Step #2: Start cutting.


This first part is a parent's job. Cut up the cereal box leaving the front and the back intact. Now decide how wide you want your frame and using your ruler, measure and mark where you need to cut. Cut the frame out with the exacto knife. I made mine 1 1/4 inches wide. 

Next cut a back for your frame the same size. And also cut a chunk out of the bottom of the back to make sliding in a picture easier. With the middle scrap piece of your frame cut a long piece of cardboard to prop the frame up.
Step #3: Pick a color


Choose your yarn and make a small ball of it. Since you'll be wrapping the frame around and around, it's much easier to deal with a small ball of yarn than a whole skein of it.
Step #4: Get gluing


Put your glue on the colorful or wrong side of your frame and begin wrapping. The solid brown side should be the front or right side of your frame just in case any of the cardboard shows through.
Step #5: Dealing with corners


The corners can be tricky. Luckily one of my sons came up with a great solution. If you trim a small triangle from each corner, it makes them easier to wrap. Also, it's best to wrap the corner on one side and then the other, alternating back and forth and filling in the gaps as you go in order to distribute the yarn evenly.

Step #6: More gluing


Once you've covered your frame in yarn, it's time to put the back on. Put a bead of glue alalong the wrong side of the back of your frame (the colorful side) and glue to your frame. Make sure you put the glue on the very edge so you leave more room for your picture. Stack some heavy books on the frame to get the front and back to stick together really well.
  
Step #7: Stand it up
Take the skinny piece of cardboard you cut out earlier and fold a small piece at the top of it. Now glue this piece to the back of your frame. 


Step #8: Get drawing
Whip up a dandy self-portrait of yourself or another piece of lovely artwork, slip it into your frame and admire your handiwork!


Monday, December 12, 2011

An Easy and Fun to Make Neighbor Gift!

I wanted to make an easy neighbor gift for Christmas this year. And fast. And cheap. And something the kids can help with? Is that too much to ask? No! Because I found this cute idea....


Snowman Popcorn Covers from Craftomaniac. Aren't they so cute? Ack! I love 'em.

And then I found this yummy popcorn on sale...
Jolly Time Mallow Magic (although I didn't buy enough....I thought there were 3 packages in each and there were only 2! So sorry, neighbors...some of you will be getting regular popcorn but I love you just the same!)

I cut plain 'ole white computer paper down to 6 1/4" by 9 1/2". Then wrote my punny message on the back Next I wrapped this around the popcorn and topping and glued the ends together, making a sleeve for the popcorn...


I found a bunch of buttons. I cut out the hats and noses and ribbon. 


And then gathered my troop of elves to help me out....


We had such a great time gluing on noses, chatting while we passed the gluesticks back and forth, drawing on faces and giggling over some of them....like this one....


Hey! Who knew snowmen had purple snot?  heh heh....ok. So, we got a good laugh out of it...

And the best part of doing crafts together?  That's it. It's doing crafts together. Spending time together.  Just being together. 


And now I have all my neighbor gifts good and ready! And even though it's something small, it's nice to give out a bit of cheer this time of year to let those around us know that we love and appreciate them.

Merry Christmas everyone!

Monday, December 5, 2011

Homemade Christmas Gifts

Projects we are (or need to be!) working on....

(By the way....all of these photos are kifed from pinterest or other's sites and blogs. I wish I already had all these stuff made.)

I'm planning on making some funky winter hats for the kids. You can check out my idea board Here. 


 Bandana Backpack

Bandana backpacks. Weston is making these for his brothers and filling one with a prank kit and the other with a magic trick kit that he's putting together himself.

little box theatre

Sam is so excited to make Zoe this puppet theater. He started working on a different version MONTHS ago but it's kind of large, so I think we'll switch to this smaller version? I don't know. But he's also made her some popsicle and pipe cleaner puppets....lol. He's so cute.


Weston is making this bandanna apron for Zoe (except in pink. of course.)


Weston again....bath tub paints for his wee sister, Molly who adores bath time.


Pinned Image

Sam is whipping up some of these bean bags for Weston to help him learn to juggle. Apparently it's better to start with bean bags (that whole rolling away thing can be a bit of a nuisance with balls)


Giant pick-up sticks....Sam is planning on making these for Emmett

Pinned Image

Zoe is hoping I will make her a mermaid doll.....but I'm not so sure I'll be able to squeeze this one in.


Pinned Image

I wish I had time to make her wee little pixies, too. So cute, right?


I think someone should put this together for Sam. He loves building forts.

Pinned Image

Zoe is going to make this for Molly....simple and fun! Molly loves pom poms and she loves stuffing things into things (well...mostly taking things OUT of things....but still....)

DIY Felt Sew Your Own Handmade Krispy Kreme style Doughnut Plushie


I was hoping to get some of these whipped up for Zoe while we traveled this last weekend, but I didn't. I read Ella Enchanted to the munchkins and slept instead (or tried to....) and attempted to keep the wee baby happy. But I'd love to make Zoe some felt food. They're just so darn stinkin' cute.


I'm going to help Zoe make these fun Lego tie tacks for her brothers. Isn't that the coolest idea?


So, my nickname for Molly is Monkey. How perfect is this Molly Monkey pattern? And it's so cute! I want to make it for her. So bad. Maybe? If I stay up all night?


Dress Up suitcase only in girly colors for Zoe.  Although I don't know. Maybe I'll cover the suitcase sides with cute fabric instead. Like this...

Floral suitcase


Ok. That is just the tip of the proverbial iceberg people.

AND I need to get massive quantities of writing done. And I need to make gingerbread houses, buy some presents, get things shipped off, wrapped up, plan a party for some little girls in my church AND keep the true meaning of Christmas in my heart. Oh and find a tree and decorate it and and and....

I thought I was going to simplify Christmas this year. *sigh*


Wednesday, November 16, 2011

Crafty Kid Fun: Eric Carle Collages

Months and months ago, my kids and I decided to try a craft from one of our favorite books, Best of FamilyFun Crafts and Boredom Busters.

It was making our very own Eric Carle Collages. Eric Carle....wow, right? Illustrator of Brown Bear, Brown Bear What Do You See? (which has always been a favorite of my children) and author/illustrator of The Very Hungry Caterpillar as well as many many other books. I've always been fascinated with his technique. What a brilliant man!

I couldn't find the craft on FamilyFun's site to link to, but here's a video to help explain it....


We used white printer paper instead of tissue paper. But I'd like to try the tissue next time. It'd be fun to see how this changes the texture of the collage. And I also think it would be easier to layer pieces. I wonder if it would rip easily though. Especially with kids in on the process.

So, anyway....like I said, months ago we started this project. We gathered the paper and the paint and then we rummaged around the house for all sorts of things we could dip in paint and stamp on the paper. We drove trucks through paint and onto paper. We tried old spools. We stamped with the green plastic flower part of fake flowers. We found a star foam shape and tried that. We went wild with paint brushes, letting ourselves splatter the paint in every which way we wanted onto the paper. 


It was quite a bit of fun.

Then we let the paint dry. And we kept meaning to get back to this project. And then....the papers got moved to the basement. 

And forgotten. 

Until Tuesday night! I pulled them out and Sam, Zoe and I got busy (Weston was elsewhere and Emmett was in trouble, sadly, and had extra chores). 
Zoe is struggling to finish her dinner there in the
background so she could get in on the collaging fun. 
It took her awhile to choke down dinner though.
So, she had to finish her masterpiece the next morning.
And for some reason she likes to wear her brother's
old tie-dyed t-shirts for jammies. 

Sam had a great time making this rockin' awesome robot....


Apparently he is mad because another robot pushed him in the back. You think he could just get even with his Laser Eyes of Death....or maybe one of those handy buttons on the front there?

Zoe made a princess.....(you, of course, recognized what it was right away. It's not like I needed to tell you , right? Of course not.) 
And I couldn't be left out of the fun....


I probably should have been doing something useful like dishes or laundry or discovering the kitchen counters I lost 3 months ago....I know they're around here somewhere. I just can't seem to reach them because of the massive piles of junk in the way..... But who wants to tidy things? Nah, cutting paper and gluing is way more fun.

This was a great way to spend the evening with my kids (well, a couple of them anyways....).

I'm planning on putting the kid's pictures up on our museum wall (that's where our artwork goes) and I just might put mine there, too! 

Here's another video about Eric Carle and his fun artistic technique...


Sunday, November 6, 2011

Fun Craft for Kids: Bead Buddies

(Alright, I'm moving some of my posts over from a previous blog that I abandoned....poor sad blog. This was originally published in November 2010) 


I had never heard of bead buddies until a few years ago when my oldest came home and showed me a cute lizard he made at his friend's house. A new craft? Well, we just had to try that. Since then my boys have made many many bead buddies. This last weekend we printed out some new patterns and the boys got busy with this fun craft again...


Sam (above) was VERY proud of himself. This was the first time he made bead buddies (mostly) by himself. He made up his own pattern for the snake and corn.


(Some of those still need to be tied off or have the strings trimmed.)


Want to try making some with your monkeys? We get most of our patterns from the Making Friend Site. These are great gifts kids can make themselves. We usually put keychain rings on ours and the kids pop them onto their backpacks. But they could also be ornaments (there are a lot of Christmas designs).

Tomorrow, while my sweet mom makes all the yummy food for Thanksgiving, I will be entetaining the horde of children with crafts. This will be one of them. Hopefully I'll keep them busy for...maybe 10-15 minutes? We can only dream.


ETA: Nope. The cousins didn't even try them last year. *sigh* Hmmmm....and I can't even remember what we did instead....maybe this year I'll trap all the kids at the craft table....Mwhahahahaha!

Monday, October 24, 2011

Pringle Can Bangle Bracelet Tutorial

Yes. That's right. You can upcycle Pringle cans or water bottles or some other plastic bottle you can easily cut with scissors or an exacto knife into *Awesome Bangle Bracelets. 


Ready for the tutorial? Alright here we go......

Find something your hand easily fits into. Now, I don't mean an oatmeal canister. Or a kleenex box.  Come on people. We're looking for a nicely proportioned cylinder. Stay with me....


Pringle cans work perfectly for me.

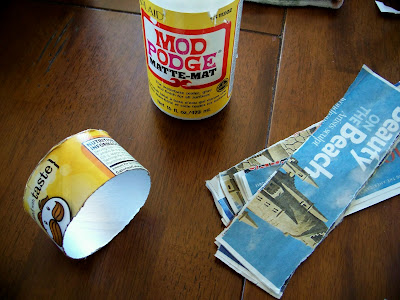
Next we need to thicken the bracelets and sturdy them up a bit.


Some people like to use strips of quilt batting. I prefer newspaper which I always seem to have on hand, especially now that my son has a paper route. So, grab the news and your Mod Podge, turn on a good movie (like The Importance of Being Earnest....anyone else LOVE that movie?) and go to town...


Now let them dry and you'll end up with something like this...


Now comes the fun part. Embellishing your new bracelets!

Add ribbon and some fun trim...


Strips of fabric, rosettes and lace....

I know, right? Pringle Can Bracelets. Who would have thought this was even possible?


Beads, bias tape and more lace (I love tying a sassy bow on the side. yeah, that's right. I said sassy.)...


Bright fabric, paper and ribbon....


Maybe even Mod Podged sheet music (ack! I love this one. It's my favorite. Come on, right? It's so cool)...


Or wrap them in embroidery floss...


There are so many options. Why not grab some maps? Or dictionary pages? These are so stinking cheap that you can make armfuls to match every outfit in your closet! (Ok. This might be a bit excessive. And, really...if you have this kind of time on your hands....you should come clean my house. I'm just sayin'.)

Enjoy!

*I originally submitted this craft to Family Fun, but sadly they already had something similar in the works. 


all crafts Homemade Projects ~ Add Yours {10/24}