Tuesday, September 2, 2014

Art Club: Salt dough and Sharpie Doodle Shirts


For our second Art Club we started with making sharpie dyed shirts. This is such a super fun technique! And so great for kids (and adults!) of all ages.


This was a practice/example shirt I made.


Seriously, I could sit around doodling on shirts or my socks or pillowcases or...well, just about anything....all day. Really. Give me a few snacks. Pop in a fun movie like My Big Fat Greek Wedding or, my latest favorite, Austenland. And hand over the sharpie. Yep. I'd be set for a doodling marathon.


You can check out my tutorial for this project here. The only difference is that while some of the kids used cups, others drew free hand. I loved seeing what they came up with!


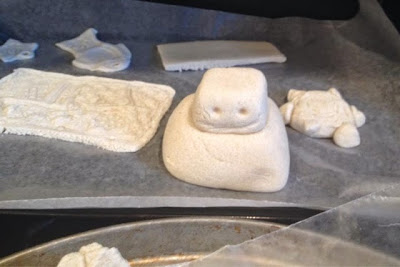
Next we got busy with salt dough. Oh! This stuff makes me feel a bit nostalgic. My mom made this for us all the time. In fact, I don't think she ever bought store bought play dough. But she was always mixing up a batch of this stuff for my friends and I. 

Have I mentioned how awesome my mom is? Yep. She really is. 


Salt Dough 

1 cup flour
1/2 cup salt
1/2 water

Mix it all together. Voila! You've got salt dough. Tough stuff, right?

For Art Club I made a giant batch of this stuff. I think I used about 8 cups of flour, 4 cups of salt and 4 cups of water.

I got out a bunch of rubbers stamps, play dough tools, rolling pins, toothpicks and other random things we found around the the house and let the kids go wild with them. 


I lined cookie sheets with wax paper and the kids put their projects on them to dry when they were finished. 


We had a few minutes left at the end so first we played a few drawing games. The blind drawing game is definitely a favorite. 


And then we broke out the pipe cleaners again.


This Art Club thing is so fun!


Friday, August 1, 2014

Invitation to Play: Straw Rocket Races


Now this was fun. 

I mean, of course rockets are fun. Duh. But I had no idea just how much fun the kids would have with this project. I mean, I think they would've made rockets all day if possible.

I set everything up for this Invitation to Play on the table and told the kids when they were done with their chores and stuff (they each have a list of things they need to do each day) then they could come make straw rockets. 

Later, after their dad surprised them by coming home with his horse to give them and some friends rides in an empty field nearby, the kids got busy. 


And their friends joined in on the fun!

Everyone made their rockets and then they lined up in our living room. I said "Ready, set....blow!" Sam was the first winner. 


Then they all scurried off to make improvements to their rockets or make new ones. I gave them a certain amount of time to work and then we had another race. Over and over again. It was so great! 


There was a lot of laughter. And cheering. And busy hands being creative. 

Which is lovely. 

Straw Rockets

Straws
Tape 
Crayons
Paper rectangles (wide enough to wrap around the straw and as long as you want) 


Color the paper rectangles. Form into a tube. Tape together. Fold down the top and tape. Slip your straw rocket onto your straw and blow! 

Try experimenting. The kids cut slits in the bottom of their rockets. They tried using two straws. They attached a small paper airplane to a tube. See what you can come up with! 

Sam is a little red in the face since he was chopping weeds
right before the big races.


Friday, July 25, 2014

Tie Dyed Fireworks Tee


So. 

We don't often go out in public in matching shirts. For that matter, we don't usually do it at home either. 

BUT when an arts project results in awesome shirts like this...then, yes. We're going to strut around town in them.


Please ignore my we-are-going-to-be-late-and-lose-our-good-spot-mom hair. With a pen sticking out of my ponytail, too. *sigh* It's a miracle my family allows me to be seen in public with them.

Anyway, yesterday was Pioneer Day! And if you live anywhere other than Utah...you probably don't have a clue what I'm talking about. 

It's a lovely day full of bonnets, wagons, throwing candy and remembering the hard work and sacrifice of the Mormon pioneers who made the long trek to settle in Utah. Yep. Because nothing says, "Thank you, pioneers!" quite like chucking candy at small children. 

In celebration of this important holiday we made fireworks tees. We tried this technique at Art Club recently and I thought it would make a fun patriotic shirt, too. This idea came to me on July 4th when I was perusing their aisles and saw the t-shirts on sale. Too bad I didn't think of it, say, on the 2nd, eh? Oh well, there's always next year. 

(If you want to skip past all the chatter to the instructions for making these awesome tie dyed fireworks shirts, go ahead. I won't judge.) 


One of our fun traditions for the fourth of July and Pioneer Day is to go a little bit early for the parade, grab our favorite seat and then eat a picnic breakfast together. This year it was bananas, yogurt, juice and powdered donuts. 


I think Molly liked the powdered donuts.


That picture is what happens when I let my teenager use my phone. Wow. Such a nice and flattering shot of me, son. Thanks. 


I love watching the sweet relationship between my oldest and my youngest. Imagine a world where every teenager had to help take care of a wee little sibling AND was also fiercely loved by that small creature. That would be amazing. 

Ok. Onto the instructions....

Tie Dyed Fireworks Tee

Supplies: 
Cotton shirt
Red and blue sharpies
Rubbing alcohol
Rubber bands 
Eye dropper or snot sucker (hmmm...I'm not sure what the real name is of those things) 
Disposable cups or yogurt containers in various sizes

This is such an easy project. Take the cups and put them into the shirt, maybe about three at a time. Pull some of the fabric over the cup and then use a rubber band to hold it in place. 

Now color the fabric circle with the sharpies. Try lines, squiggles, dots, hearts....anything you can dream up! 


After you're done with a circle, drop rubbing alcohol on in the middle of it. Start with a little and go from there. The alcohol will probably spread farther than you think it will.


Let it dry, take cups out, move to a new spot and repeat until you have as many fireworks as you want. 


We found that lines and dots end up looking like fireworks the most, once they've had alcohol put on them. But random scribbling is fun, too!


Now, to set the colors. We tried heat setting some different shirts we did and then washing them. But....sadly, some of the colors faded. So, I'm going to try ironing our fireworks shirts really good to see if that helps set the colors better. 

Every now and then we even get my cute husband to do art projects with us....